Where it all starts..

Ok, so there's this annual halloween party, which became a fancy dress party, which I started out by attending as Little Red Riding Hood, with an off the shelf costume. The year after I found a seller on ebay who could make things to size, and managed a passable Medieval Scottish Widow attempt.

This year, the challenge was very much, can I make the entire costume myself? where to start, a lot to learn (having never used a sewing machine before).

After a lot of looking around, eventually I settled on this ..

Which I figured was kind of doable.. and not as trivial as say.. a ghost using a sheet with 2 eyeholes ;-).

Now, I know I'm not going to get close to this, and besides I think it needs a few tweaks, as although black is pretty awesome, a costume needs a little more color in it.

The choice is made..

Starting out..

Ok, so clearly, having found a nice Bat image, I needed to know a little more.. turns out this one is just an illustration, which is handy, as I wont have to bother getting everything right ;-)


Given that multiple shades black & gray are not ideal to work with.. I started by throwing the image through an edge-detector, to get a better idea for the details.


This lets me see just the sort of bits the overall costume would need, and where they attach, and so on.

However it also lost a few bits, so I ended up tracing over it, creating this pencil based monstrosity.

Not bad, provided bat-thing doesnt look in the mirror, Im probably safe.

From this, I decided I could smash the costume up into bits that could be attempted one by one.

  • Mask
  • Cape & Attachment
  • Gauntlets/Gloves
  • Bodice
  • Leg Armor
  • Boots
  • Chest


At a guess, I figured I could do something like this.. 

The gauntlets, shoulders, cape all get split off to be made up out of something that looks good..

Then I build an undershirt, and hang the rest over the front of that.

Leggings should work with a standard pair, with the armor bits attached as required.

Lots of tabs to help hold it all together.

I kinda figure some sorta skirt will be required as well, as kids will be present, and I dont want to mentally scar them for life.. again..

That leaves the bodice part, which I figure can work with something like this..


Take a basic underbust corset, add the details ontop..

Then start thinking about how to keep the whole lot together, here playing around with the idea of having hidden fasteners under the hip armor, which can attach to the leggings to prevent them slipping down.

Not clear at this stage yet how to resolve the skirt (wavy bit on middle right image here) cutting the armor panels with its waistline.

More thought needed yet!!

All shapes & sizes

Ok, so time to think more about the whole chest area.. It's going to need a little enhancement, and I need to get an idea for sizes, practicality and so on.


A little thought and I realised that theres plenty of info on how to make this stuff, providing you are starting with the correct figure. Of course, there's not that much help on what to do if you are not.

So I started by plotting out various measurements...

Some of which are a little unusual, as having to create the chest area requires a little more thought if they are not to look like two melons welded to my front.

After some careful thought & referring to 'standard' sizes for these things, I settled on a moderate size ;-).


I also started to think about those shoulders.. just how to make that shape from anything flat..

It doesnt feel easy, and my first approach seems to create one with too much of a ridge at the top..


I can get the slope to look ok, but not the top..

Suspecting I might have to introduce a flat top cap, but I really dont like that idea.. might end up looking a bit too much like a soldier from the nutcracker suite then.

Legs that go all the way up to eleven.

Given that I have to make this costume.. not just assemble it out of so many shop bought bits.. I figured it was time to work out the leggings..

Turns out theres a vast resource of this stuff out there, http://www.patternschool.com and http://www.stretchy.org are both amazing sites if you are starting out trying to figure out just how all the bits need to gotogether (for way more than just leggings).

So I decided that given that a straight leggings pattern looked so simple, I'd want to make it a bit more entertaining, and try to move the seam to the center rear leg.. after all, a Bat should try to look good, right?

So, I drew out a few backsides.. and the leggings front & back.. and then tried to see what options there were starting from a center back seam per leg.

Quite a few!

I settled on the last one (bottom right), bringing the seams round from the rear leg up to the side of the hips in a smoothish curve.

All I need to do now is figure out just what that did to my pattern. At this stage I realise I have issues comprehending the mapping of a flat surface over a shape with no obvious corners..


So I cheat.. yay for primark, where you can buy a pair of leggings for 3 pounds.. I'm sure theres an entire story to be written here at why I'm even bothering to make a pair, when I could just buy one from there, or how they manage to make them for less than the cost I could buy the material for, let alone that they can clearly already sew in a straight line ;-)


Insanely cheap leggings in hand, and some tailors chalk, mark the lines, cut the lines, cut through the crotch to seperate the legs, and then lay the resulting piece down & carefully trace out the outline, being really careful to keep the fabric all under the same amount of tension.. easy! (mutter mutter)


With that done, I present the worlds oddest leg pattern.


If you plan to make a pair, you'll need to:
  • cut two of the right hand pattern as opposites..
  • for each bit, sew into a tube by sewing the longest sides together 
    • Yes, the curves do make this a bit of a pain
    • Yes, sewing lycra isn't easy
    • Top tip, cheat & use temporary spray glue, 505 makes sewing this stuff almost easy.
  • Join the two tubes along the crotch seam... 
If you got all that right.. you end up with something a little like this.. Though I probably wouldnt recommend using lilac.

Especially not this lilac, which is the most evil cloth ever to try to sew. So lightweight the feed dogs kept trying to eat the cloth rather than feed it. So stretchy that the slightest tug means your seam ends up wonky.

Still.. the seams did end up where they were supposed to, score one for cutting up stuff from primark !

Joining things together...

For the legs, and corset, and probably other bits, I'm going to need to make the armor details and attach them to the fabric. A quick glance over previous bat-people shows it to generally be black matte rubber of some sort, looks like a challenge =)

Craft foam seems quite popular for building armor, there's even a few tutorials on it online, so I ordered a few sheets off ebay to use for tests. Comes in a variety of colors, including black ;-).

It's flat, smooth, a little spongy, apparenty you can heat form it, but I decided against trying that this time =) looks like it might sew ok, although if the stitches get too dense, it might perforate it.. needs thought.

I decided to see how to join this stuff to the lycra the leggings will be made from, I started by figuring I could glue it, and went looking for glues =) Poor blokey at staples must have thought me a bit odd, purchasing 8 small tubes of different types of glue.. just to be sure, I asked around at work, and then ordered another 5 or so types from ebay.

I ended up with this lot.. which I should probably state up front, may or may not be suitable for what I planned.. but I figured there's more fun in experimenting than reading guidelines ;-)
  • Pritt-stick
  • Generic 'Super Glue'
  • PVA Glue
  • Generic Liquid clear glue in a tube
  • A different brand of PVA glue
  • Copydex
  • Guttermans HT-2
  • 3M Spray Mount
  • 3M Permanent Spray Adhesive
  • Pronty glue
  • Sew Quick
  • A tube of Bostick
  • Generic Fabric Glue
Ok, to test all these, I clearly needed to stretch a bit of lycra and then glue some craft foam to it, then once dry, see if the stuff would stay stuck when the lycra is unstretched. This way I figure the lycra won't end up all wrinkly like it would if I just glued it unstretched, then tried to stretch it afterward. Even if I only get it to glue for a while, I have the option of sewing it on while glued.

So, stretching lycra.. I'd need something like my legs, right? something exactly like my legs, since the amount of stretch should be what it shall be when worn.

Now I could use my legs.. but then, how to explain to the A&E department that the reason I have craft foam & lycra glued to my legs, with lots of different glue types, which I have no idea of the solvents for.. is that I was experimenting for a halloween costume?

Cue building a duplicate set of legs, 1 Primark cheap (very cheap this time, seems even Primark reduce things that don't sell, and these nasty brown leggings certainly wouldnt sell) pair of leggings, 1 reel of duct tape, and a big pile of spare t-shirts.. equals that.. yes, I've even doodled the armor bits onto it..

If you plan to make your very own set of duplicate legs, I don't know, to say, leave sticking out from under vehicles, or hanging in view of windows.. then this tip may be useful: If you have hairy legs, either wrap them in clingfilm before putting on the leggings to tape.. or shave them.. seems the hairs can happily go thru the lycra, and end up glued to the tape.. also, you may want to plan on having a helper around if only to cut you free once you're done wrapping.

So, the results! what worked?


Not much.

Pritt-stick didnt stand a chance, it never managed to 'grab' either the cloth, or the craft foam, best stick to using this stuff on paper. Generic 'Super Glue', PVA Glue, Generic Liquid Glue, Pronty Glue, Sew Quick, Bostick, and Generic Fabric Glue, all suffered the same fate. They were unable to dry out enough to form a bond, reading up online seems to say lycra is non absorbent, and so is my craft foam. 3M managed to make a rather good attempt, but couldnt withstand being unstretched, it would peel away as soon as the tension was let off... Which leaves, Guttermans HT-2 and the Copydex; the HT-2 was good, but at the price it cost I'd either need to be designing a costume for Barbie, or owning a small island somewhere to pay for it. The Copydex on the other hand was awesome, cheap, stank of fish, and worked a treat.. reading up on this, it seems Copydex is a latex rubber based adhesive, and it's working well here because its going into and through the weave of the lycra before drying as a pad which is stuck to the foam.

Problem solved then.. Copydex it is? except it dries white, and Bat-thing isnt well known for the white splotches where the armor is glued on.

Still.. latex based.. I wonder what ebay has.. black latex paint? I feel more experiments are called for!

Cast without crew

With my experiments in gluing things together looking good.. I orded a bottle of black latex paint from ebay.

This stuff is advertised for hen parties, and for suitable kinky people to literally paint a 2nd skin onto themselves as clothing.. awesome, and much like the fake legs, not for hairy people!

After a quick successful test to see if I could use it as glue, (since its not exactly sticky, unlike Copydex).. I started wondering if I could actually cast details with it.. Thankfully the local supermarket was disposing of some childrens modelling clay which lead to my 1st experiment of making a mold, pouring a layer in, letting it dry, rinse, repeat etc.. looked a bit like this...


Not too bad, tried adding some silver paint too..

The right hand one, looks a bit melted, where the 1st layer didnt entirely set before I unpeeled it from the mould..

(Extra credit if anyone can identify what I used to make the silver raised pattern on the left cast ;-) )

So I can make shiny things to attach, but how do they actually get stuck to the clothing ??

Seems the trick for glueing this stuff to cloth is; mask out the area with duct tape, paint a layer of latex paint, let it dry, repeat until you have a solid rubber pad sticking out. Unmask the area, paint the pad & the back of the thing to stick to it with more latex paint, gently press into place and leave it for a day or five.


But first, you have to make the things to glue on!

From my 1st experiment in making a mould, I knew I'd never get the details right in inverse, at least not without repeatedly leaving fingerprints & dents on the bits that were sposed to be smooth.. so I figured I could create positives of the parts in wood, then make the moulds from the positives.


At this stage, I should say that Dremels are awesome, very very awesome, and also that you should probably wear a dust mask, and ideally not wave the rotating bit quite as close to your hands as I did ;-) especially not when it's fitted with the sanding rotaty thing of wood eating. Somehow, I managed to avoid any injury, and ended up with these..

Not too bad.. if you try this.. the Dremel is great at eating wood.. but not great if you want flat surfaces afterward.. for that, use a sheet of sandpaper on a flat surface, and take all the skin off your knuckles.. it works better that way.

 Back to the bits anyway, with the positives created, I built the moulds using the clay..  then poured latex paint into each, and let it set.. this took about a week for each part.

That's the 4 bits at the base, plus the 2 top bits each side. Since the top two each side were identical, I reused the moulds, added a week, but since I did the single pair of those first, it taught me a few things for the bottom ones, about drying times etc.
Around this point I should probably mention, latex paint is easy to clean up from: tiled floors, tables, walls, windows, window sills, plant pots, plants, and skirting boards.

Do NOT expect it to clean up well from anything fabric, or hair.

Thankfully my attempt to backhand an open bottle of latex paint across the table didn't meet any fabric. It did however meet most of the above =).

Also worth remembering.. do not shake the bottle before pouring to get an even mix.. all you end up doing is making latex bits full of air bubbles that either ruin the finish, or cause large cracks during drying.. As it dries, it shrinks, which is fine if its one bit, if theres a crack, it'll shrink apart leaving something you have to fix.


Was it all worth it? did they come out ok ? I think so.. more or less, I suspect they need a dip coat in bit more paint to hide some of those surface defects..


Well.. thats the front ones.. about a months effort on and off, making the bits, letting stuff dry, peeling spilt latex off walls, etc.

The side ones I thought I'd try something a little simpler with.. craft foam, glued together painted over with latex paint to match the front panels, and use a little cloth for texture..


Well that concludes this part.. next time, I'll look at the guantlets & the shoulders.

Trimmings

Well Bat-thing doesnt end at just having funky bits of latex glued to the costume.. apparently the modern Bat-thing just wouldn't be seen dead without their gauntlets with pointy spike things, and appropriate shoulder armor.

Yeah.. umm..  still, the gauntlets look fairly simple.. bit of craft foam.. wrap round lower arm, secure with some elastic, and shove the pointy bits thru a slit. Easy!


So.. I started with some paper.. wrapped it around my arm, secured it with some tape, then drew the rough pattern onto that.. unstuck the tape (remembering once again that sticky things are not compatible with hairy people).. hacked at the resulting bit of paper with some scissors and finally shoved what should have been pointy spike things, that ended up looking more like golf flags.

Still.. shape of the spikes aside, the basic concept was sound.. so I transferred the shapes over to craft foam, and then had the genius idea to try coating the foam in a textured fabric, then gluing the fabric to the foam using the infamous black latex paint.


The results looked pretty good.. I handstitched the edge to ensure it all holds together, and decided that pink should make a pretty good Bat-thing highlight color.. I'll try to work the color in without overdoing it. I've also decided that handstitching sucks, especially when pushing a needle thru 2 layers of rubberised cloth & craftfoam, when the needle repeatedly decides to go backwards into the thumb rather than forwards through through the fabric. Yes, thimbles, great, really helpful, now.

Once the arm bits were done.. I made up the little spikey bits using some pink vinyl fabric (ebay), padding out the center of each with a little craft foam, each spike was handstitched using black thread, that way it sorta feels like it balances out the black with pink thread.

These took a while to make up, but once done I think the final gauntlets look pretty good, although I had to hand overlock & stitch the elastic loops to stop them fraying into non existence before the first wearing.


Well.. that was the gauntlets sorted.. now.. what about those shoulders?


Again, start with a bit of paper, sketch the pattern, cut it out, transfer to craft foam, smother it with fabric & latex paint.. then for added trim, add more craft foam to edge the part (no more sewing the edges, poor thumb)... and generously coat in yet more paint.

Rinse & repeat for the other arm, remembering to flip the pattern (unless you happen to really have two left, or two right arms, then you might get away without flipping it, but then you might want to read the Alien-thing blog, rathert than this one.).

After that.. I've just got to figure out the elastic & the actual shoulder cap bit.. I'm still not liking the original design.. or the flat topped design.. keeping my eyes peeled for something to reuse.

Next time, an update on the progress of the corset & legs..

I've got a crush on me

My trusty trained assistant delivered my corset today.. she attended a course on corset making a while back, and has proven that she's more than remembered enough to create items of awesomeness.

So we took a basic underbust corset pattern, messed around the the lengths a little here & there, to make it a little more comfortable for my frame, and agreed on materials. In this case, it's built from coutil panels, with lycra on top to give it the same look as the rest of the bat outfit. (Bat-thing requires coordination!)

Didnt need the stretch from the lycra for this part, so the lycra was just glued to the coutil using 3M spray glue, to allow the cutting & sewing to go ahead as if there were only the 1 material to work with. The boning is a mix of spiral boned, flat steel boned, and some plastic boning.. all edged with satin binding tape stuff.. At least I hope I got all that right, since I didn't make this bit, I can't say for certain.

Anyway, it looks awesome, so now I just need to ruin it, and attach my armor panels ;-) (all of which have had a dip coat of paint since last photographed, to minimise brush strokes, wood grain effect ;-) etc. They did all look a bit odd hanging from the airer, but I think they look nicer for it.)

I end up grabbing an old duvet rolling it up, and bagging it in a pile of those "super free never quite sure if its really a charity" bags that helpful people keep putting through my letter box. Then I put the corset over that lot & laced it down as tight as I could get.

My reasoning here is that I need to attach all the panels while the corset is under tension, otherwise they'll just pop right off when it's laced back up.

Not that many interesting photos here of the process, that involved much duct tape, careful painting, drying, painting, drying, and then finally, unmasking, more painting, and then the comedy bit where I had to maintain pressure between the armor & the corset while the painty-glue set. Cue comedy use of a few old pairs of tights.. pretty awesome since they can be made to stretch wide as they passed over the armor, and yet stretched & pulled tight & knotted to provide the pressure. This all had to be repeated 4 times, once for each quarter worth of armor to attach.


A week or so later, here's what I'd ended up with =)

It can't actually sit flat anymore, as the armor panels are holding it to it's curved shape!

And the legs? well, I recut the pattern using something less evil than lilac lycra, the black stuff seems nicer to work with. And I'd made up these panels to attach them...

But once I'd painted them up.. they looked a bit more like this..

Which just didnt have the look I was trying for, the splotchy paint effect wasnt even enough. I could improve it massively if I could dip them, but the parts are so large, I wouldnt have enough paint unless I bought insane amounts..  so I thought I'd change plan, and try using just the same cloth effect Im using for the gauntlets & shoulders..

More duct tape masking, careful painting, and I ended up with this..

Sadly, the paint did bleed out quite substantially under the duct tape this time.. so the edges aren't as neat as I'd like

And the placement of the panels isn't 100% identical, but then given they are mounted on stretch fabric, they'll be moving about a bit anyways.

I definitely prefer this effect to the overshiny panels though.

The waist on the leggings is made deliberately high, and the legs deliberately long, that way the waist should be held up by the corset, and the legs long enough to use as a stirrup type ending to stop the legs drifting too far up/down.


Next up all the other sewy bits I've done, but failed to mention so far!

All the parts that make a whole..


 There's been quite a lot of activity that hasnt made it to this blog.. I've made up an undershirt that will form the basic top part of the costume..

Raglan sleeves were a challenge.. but hardest of all was attaching the neck. Originally I wasnt going to put one on, but after seeing how the undershirt turned out, I decided it needed that polo neck to complete it.

The sleeves are made with some 1 way stretch dotty hole fabric (wicking fabric?) the same stuff Im using to texture the gauntlets/legs/shoulders with.

However here I'm using it in its normal form, which proved a bit more of a challenge than I planned, when I made up the 1st arm with the stretch in the wrong direction.. if you know any people with one very long arm thats very thin.. I have just the sleeve for them.

If you are like most normal people, then keep the stretch going around the arm, not along it ;-)
Back of top.

Front of top
The final result isnt too bad, even if I did have to cheat a little & top seam the neck on.

At this point I begin to hate blogger for rotating some of my photos.. yes I could likely fix this, but for now, I'll ignore them.. got too much to do to worry about rotating things here.


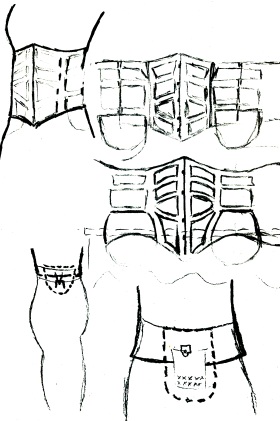
Over the undershirt, goes the corset, that you've already seen, and the Bat-Bra.  The essential Bat-Mammary containment unit, intended to offer support, and protection from all those evil villians out there.

I started attempting to clone a bullet-bra, but rapidly realised that having that many straight seams all meeting at a point was well beyond my sewing. So I hit on the idea of cladding an existing bra with the black lycra to make it match the rest of the costume, another score for discount culture, a cheap black sports bra made an awesome start, I carefully copied each panel onto paper, added seam allowance, recut it from lycra, then joined it all together & joined it to the bra.


But the Bat-Bra was not yet complete, for Bat-Thing demands a strong recognisable brand, to enable merchandising, and lucrative productisation of important bat accessories, such as Bat-Lipstick, Bat-Styling Tongs, and Bat-GasBBQs.

So this is the rough space I have available, although strongly tempted to go for a big stylised 'S', (say in red & yellow).. I figure some sort of bat may be more appropriate.


A quick sketch later, and I'm headed for this variant, which fits pretty well into the shape.

So I carefully cut the shape out of some black lycra, back the whole piece with some baby pink vinyl (the same as used for the gauntlets)

And carefully, with alignment marks, sew the entire thing into the v-shape of the Bat-Bra.
 And here's the finished item.. it does of course look a lot more shapely when filled out =)

The bat really is pink, although the light in the photo makes it look a bit nuclear white.

Lastly there was the skirt, planned originally to be a sort of pleaty gathery thing with scalloped bat-like edges (see "Starting Out"). Since then I've gained this pink highlight color, and have decided it would be a good idea to integrate that into the skirt.

I figured on a couple of front pink pleats, and maybe a belt, (Bat-Thing has to have a belt, to store all those Bat-Cosmetics). My first guess is it should look a little like this.


 Once again, discount economy comes to the rescue, the end of summer sale of sale items now reduced to sale item on sale during the last chance everything must go sale of sales, delivered me a somewhat plain, size 20 black office skirt.

I'm not size 20, and the office skirt was sorta just above the knee, which might be awesome for the office, but is not awesome if you are Bat-Thing, and need freedom to do high kicks, and choke villains to unconciousness between your powerful legs.

I hacked off the lower 6 inches or so, cut open the front seams, added the pleats, took the front seams in by an inch or two each side, rejoined the waistline using some elastic across the split, took the left over fabric & crafted 6 belt loops & attached those & found me a luggage strap to use as a belt.  Bat-Thing is happy.


Finally, Bat-Thing needed a way to ensure that should she end up accidentally leaving the odd villian or two attached to railroad tracks, that there wouldn't be any incriminating evidence pointing back to the Bat.

We're talking gloves, which turned out to be remarkably simple to make. Draw around hand, fold at the index finger, sew, cut hole for thumb & attach thumb bit. All easy.. except the thumb bit.. had to do that by hand.. nasty nasty.

I probably dont have a future making custom opera gloves ;-)

Unless you like attending the opera looking like a raggedy-anne doll, or you are Bat-Thing, and the opera is merely something you are attending to catch the evil bad guy.

Next time.. the cape.