Showing posts with label torso armor. Show all posts

Starting out..

Ok, so clearly, having found a nice Bat image, I needed to know a little more.. turns out this one is just an illustration, which is handy, as I wont have to bother getting everything right ;-)


Given that multiple shades black & gray are not ideal to work with.. I started by throwing the image through an edge-detector, to get a better idea for the details.


This lets me see just the sort of bits the overall costume would need, and where they attach, and so on.

However it also lost a few bits, so I ended up tracing over it, creating this pencil based monstrosity.

Not bad, provided bat-thing doesnt look in the mirror, Im probably safe.

From this, I decided I could smash the costume up into bits that could be attempted one by one.

  • Mask
  • Cape & Attachment
  • Gauntlets/Gloves
  • Bodice
  • Leg Armor
  • Boots
  • Chest


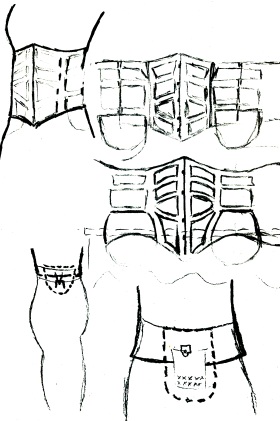
At a guess, I figured I could do something like this.. 

The gauntlets, shoulders, cape all get split off to be made up out of something that looks good..

Then I build an undershirt, and hang the rest over the front of that.

Leggings should work with a standard pair, with the armor bits attached as required.

Lots of tabs to help hold it all together.

I kinda figure some sorta skirt will be required as well, as kids will be present, and I dont want to mentally scar them for life.. again..

That leaves the bodice part, which I figure can work with something like this..


Take a basic underbust corset, add the details ontop..

Then start thinking about how to keep the whole lot together, here playing around with the idea of having hidden fasteners under the hip armor, which can attach to the leggings to prevent them slipping down.

Not clear at this stage yet how to resolve the skirt (wavy bit on middle right image here) cutting the armor panels with its waistline.

More thought needed yet!!

Cast without crew

With my experiments in gluing things together looking good.. I orded a bottle of black latex paint from ebay.

This stuff is advertised for hen parties, and for suitable kinky people to literally paint a 2nd skin onto themselves as clothing.. awesome, and much like the fake legs, not for hairy people!

After a quick successful test to see if I could use it as glue, (since its not exactly sticky, unlike Copydex).. I started wondering if I could actually cast details with it.. Thankfully the local supermarket was disposing of some childrens modelling clay which lead to my 1st experiment of making a mold, pouring a layer in, letting it dry, rinse, repeat etc.. looked a bit like this...


Not too bad, tried adding some silver paint too..

The right hand one, looks a bit melted, where the 1st layer didnt entirely set before I unpeeled it from the mould..

(Extra credit if anyone can identify what I used to make the silver raised pattern on the left cast ;-) )

So I can make shiny things to attach, but how do they actually get stuck to the clothing ??

Seems the trick for glueing this stuff to cloth is; mask out the area with duct tape, paint a layer of latex paint, let it dry, repeat until you have a solid rubber pad sticking out. Unmask the area, paint the pad & the back of the thing to stick to it with more latex paint, gently press into place and leave it for a day or five.


But first, you have to make the things to glue on!

From my 1st experiment in making a mould, I knew I'd never get the details right in inverse, at least not without repeatedly leaving fingerprints & dents on the bits that were sposed to be smooth.. so I figured I could create positives of the parts in wood, then make the moulds from the positives.


At this stage, I should say that Dremels are awesome, very very awesome, and also that you should probably wear a dust mask, and ideally not wave the rotating bit quite as close to your hands as I did ;-) especially not when it's fitted with the sanding rotaty thing of wood eating. Somehow, I managed to avoid any injury, and ended up with these..

Not too bad.. if you try this.. the Dremel is great at eating wood.. but not great if you want flat surfaces afterward.. for that, use a sheet of sandpaper on a flat surface, and take all the skin off your knuckles.. it works better that way.

 Back to the bits anyway, with the positives created, I built the moulds using the clay..  then poured latex paint into each, and let it set.. this took about a week for each part.

That's the 4 bits at the base, plus the 2 top bits each side. Since the top two each side were identical, I reused the moulds, added a week, but since I did the single pair of those first, it taught me a few things for the bottom ones, about drying times etc.
Around this point I should probably mention, latex paint is easy to clean up from: tiled floors, tables, walls, windows, window sills, plant pots, plants, and skirting boards.

Do NOT expect it to clean up well from anything fabric, or hair.

Thankfully my attempt to backhand an open bottle of latex paint across the table didn't meet any fabric. It did however meet most of the above =).

Also worth remembering.. do not shake the bottle before pouring to get an even mix.. all you end up doing is making latex bits full of air bubbles that either ruin the finish, or cause large cracks during drying.. As it dries, it shrinks, which is fine if its one bit, if theres a crack, it'll shrink apart leaving something you have to fix.


Was it all worth it? did they come out ok ? I think so.. more or less, I suspect they need a dip coat in bit more paint to hide some of those surface defects..


Well.. thats the front ones.. about a months effort on and off, making the bits, letting stuff dry, peeling spilt latex off walls, etc.

The side ones I thought I'd try something a little simpler with.. craft foam, glued together painted over with latex paint to match the front panels, and use a little cloth for texture..


Well that concludes this part.. next time, I'll look at the guantlets & the shoulders.

I've got a crush on me

My trusty trained assistant delivered my corset today.. she attended a course on corset making a while back, and has proven that she's more than remembered enough to create items of awesomeness.

So we took a basic underbust corset pattern, messed around the the lengths a little here & there, to make it a little more comfortable for my frame, and agreed on materials. In this case, it's built from coutil panels, with lycra on top to give it the same look as the rest of the bat outfit. (Bat-thing requires coordination!)

Didnt need the stretch from the lycra for this part, so the lycra was just glued to the coutil using 3M spray glue, to allow the cutting & sewing to go ahead as if there were only the 1 material to work with. The boning is a mix of spiral boned, flat steel boned, and some plastic boning.. all edged with satin binding tape stuff.. At least I hope I got all that right, since I didn't make this bit, I can't say for certain.

Anyway, it looks awesome, so now I just need to ruin it, and attach my armor panels ;-) (all of which have had a dip coat of paint since last photographed, to minimise brush strokes, wood grain effect ;-) etc. They did all look a bit odd hanging from the airer, but I think they look nicer for it.)

I end up grabbing an old duvet rolling it up, and bagging it in a pile of those "super free never quite sure if its really a charity" bags that helpful people keep putting through my letter box. Then I put the corset over that lot & laced it down as tight as I could get.

My reasoning here is that I need to attach all the panels while the corset is under tension, otherwise they'll just pop right off when it's laced back up.

Not that many interesting photos here of the process, that involved much duct tape, careful painting, drying, painting, drying, and then finally, unmasking, more painting, and then the comedy bit where I had to maintain pressure between the armor & the corset while the painty-glue set. Cue comedy use of a few old pairs of tights.. pretty awesome since they can be made to stretch wide as they passed over the armor, and yet stretched & pulled tight & knotted to provide the pressure. This all had to be repeated 4 times, once for each quarter worth of armor to attach.


A week or so later, here's what I'd ended up with =)

It can't actually sit flat anymore, as the armor panels are holding it to it's curved shape!

And the legs? well, I recut the pattern using something less evil than lilac lycra, the black stuff seems nicer to work with. And I'd made up these panels to attach them...

But once I'd painted them up.. they looked a bit more like this..

Which just didnt have the look I was trying for, the splotchy paint effect wasnt even enough. I could improve it massively if I could dip them, but the parts are so large, I wouldnt have enough paint unless I bought insane amounts..  so I thought I'd change plan, and try using just the same cloth effect Im using for the gauntlets & shoulders..

More duct tape masking, careful painting, and I ended up with this..

Sadly, the paint did bleed out quite substantially under the duct tape this time.. so the edges aren't as neat as I'd like

And the placement of the panels isn't 100% identical, but then given they are mounted on stretch fabric, they'll be moving about a bit anyways.

I definitely prefer this effect to the overshiny panels though.

The waist on the leggings is made deliberately high, and the legs deliberately long, that way the waist should be held up by the corset, and the legs long enough to use as a stirrup type ending to stop the legs drifting too far up/down.


Next up all the other sewy bits I've done, but failed to mention so far!

Party time.. excellent.. Party Time..

Woot.. party done.. the blog is now open.. if you've read this far & are a regular reader of other blogs, you'll likely wonder why this one seems to run backwards.. the answer is, this blog was private until the party, and there's no easy way to explain to most people they need to navigate to the end & scroll up to read in order ;-)

Anyways.. Im sure you are all waiting for these ;)